Federated Sign In Using Azure AD to use AWS Services in a Web Application
This solution demonstrates how to securely access AWS services in a web application using Azure Active Directory for federated identity authentication. To achieve this, we will configure Azure Active Directory (Azure AD) as an identity provider in AWS using OpenID Connect (OIDC). This integration will allow us to use AWS Cognito Identity Pools to enable users to exchange their OAuth2 tokens from Azure AD for temporary IAM credentials. These credentials will then be used in the web app to securely access AWS services.

As an example, we have a React application that allows users to list, download, upload, and delete files stored in an S3 bucket. Each user only has access to their own files and is restricted from viewing or modifying files belonging to other users. This is achieved using AWS IAM policies with attribute-based access control (ABAC), where the user’s identity is used to dynamically enforce access permissions. This ensures a secure and personalized experience for each user without requiring a backend to manage access control.

1. Registering an Application in Azure AD.
In the Azure Portal, go to the Active Directory service (now called Microsoft Entra ID). Under “App Registrations”, make a new registration and define a callback URL for your web application. This is where we will receive the OAuth2 tokens when a user signs in succesfully. We will be using a static react website so we choose “single-page application” as the platform of choice. The callback URL for our React app will be running locally in the /callback route.

Once the application is registered, note the OAuth2 endpoint and the application client ID. The endpoint should look like this: https://login.microsoftonline.com/{tenant_id}/oauth2/v2.0. This will be used to send the user to the Azure AD login page.
There are multiple authentication flows that can be used to get the tokens from the OAuth2 endpoint. The best practice is to use the authorization code flow with PKCE, which adds an extra layer of security by requiring the client to prove it initiated the request, preventing interception attacks. For simplicity, we will use implicit flow which is quicker and shorter because it skips the code exchange step and directly returns tokens to the client. To enable implicit flow, click on the “Authentication” tab and check the boxes for “Access tokens” and “ID tokens” under the implicit flow section.
The last step is to add the AD users that will be allowed to sign in. To do this, we navigate to “Enterprise Applications” in the Microsoft Entra ID portal and add the users to the application we registered under “Users and Groups”.
Testing the Azure AD Sign-In.
We should now be able to sign in and get the tokens from Azure AD. The login is done by navigating to the /authorize route of our Azure AD endpoint. In the URL, we specify the application client id and callback url we configured in Azure earlier.
https://login.microsoftonline.com/{tenant_id}/oauth2/v2.0/authorize?client_id={client_id}&response_type=id_token&redirect_uri={callback_url}&scope=openid profile email&nonce=1234
The nonce parameter is a random value that is used to prevent replay attacks. For security, this value should be generated randomly for each request and validated when the token is received. We will leave it as a static value for simplicity in this example. For a full explanation of all the query parameters you can use in the authorize request, see the Azure AD implicit flow documentation.
When we try to sign in using the login URL in a web browser, we will be redirected to the Azure AD login page. After a successful login, we get redirected back to our callback URL with the tokens in the URL hash. Grab the id token from the URL and decode it. An easy way to do this is to paste the token in the jwt.io website. The decoded token should contain the user’s email and other information that we can use to identify the user. In our example, our id token has some values similar to the following:
{
  "aud": "00000003-0000-0000-c000-000000000000",
  "iss": "https://login.microsoftonline.com/{tenant_id}/v2.0",
  "iat": 1640000000,
  "nbf": 1640000000,
  "exp": 1640000000,
  "aio": "E2ZgYBcJjw==",
  "name": "John Doe",
  "preferred_username": "john@onmicrosoft.com",
}
2. Integrating our Azure AD Identity Provider in AWS.
The next step is to register our Azure AD application as an identity provider in AWS. In the AWS console, go to the Identity Providers section in IAM. Add a new OpenID Connect provider using the Azure AD OAuth2 endpoint and the client ID we noted earlier.

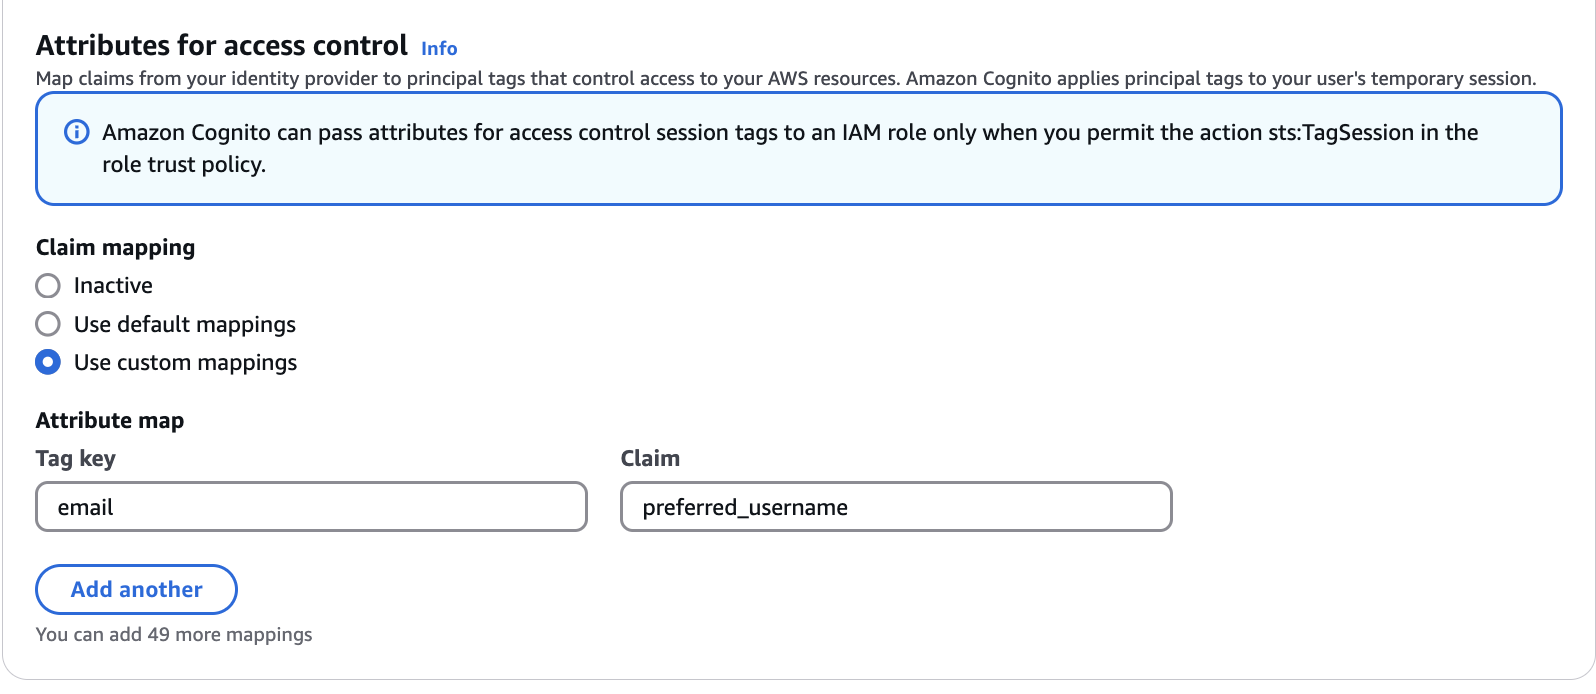
Once we have the identity provider set up, we can create a new Identity Pool in AWS Cognito. Go to the Identity Pool section in Cognito and create a new identity pool. Specify an IAM role for authenticated access and choose the identity provider we created earlier. We want to be able map the user’s email from the id token to principal tags we can use in IAM policies. This will allow us to use the user’s email as a condition in our IAM policies. In our example, we map the preferred_username claim from the id token to the email principal tag.
Once the identity pool is created, we need to note the identity pool ID and the identity provider name. The identity pool ID should be in the format {aws_region}:00000000-0000-0000-0000-000000000000 and the provider name should just be the OAuth2 endpoint in the form of login.microsoftonline.com/{tenant_id}/v2.0. These values can be seen in the Identity Pool details in the AWS console.
Writing an Attribute-Based Access Control Policy.
With attribute-based access control (ABAC), we can create dynamic IAM policies that leverage a user’s identity to enforce fine-grained access control. In this example, our goal is to ensure that users can only access files that belong to them. To achieve this, we define an IAM policy for the identity pool role that permits users to perform actions on S3 objects only if those objects are located within their personal folder. The S3 bucket will include a top-level folder named s3app, with each user having their own subfolder named after their email address. This email address is retrieved from the email principal tag we mapped earlier, allowing us to dynamically map access permissions to each user’s identity. More information about using user’s attributes for access control can be found here: https://docs.aws.amazon.com/cognito/latest/developerguide/attributes-for-access-control.html?icmpid=docs_cognito_console_help_panel.
{
    "Version": "2012-10-17",
    "Statement": [
        {
            "Sid": "ListYourObjects",
            "Effect": "Allow",
            "Action": "s3:ListBucket",
            "Resource": [
                "arn:aws:s3:::my-bucket"
            ],
            "Condition": {
                "StringLike": {
                    "s3:prefix": [
                        "s3app/${aws:PrincipalTag/email}/*"
                    ]
                }
            }
        },
        {
            "Sid": "ReadWriteDeleteYourObjects",
            "Effect": "Allow",
            "Action": [
                "s3:DeleteObject",
                "s3:GetObject",
                "s3:PutObject"
            ],
            "Resource": [
                "arn:aws:s3:::my-bucket/s3app/${aws:PrincipalTag/email}/*"
            ]
        }
    ]
}
Lastly, we need to make sure the trust policy of the role is allowed to perform the sts:TagSession action. This is required to map the principal tags from the identity pool to the session. Your trust policy should look like the following:
{
    "Version": "2012-10-17",
    "Statement": [
        {
            "Effect": "Allow",
            "Principal": {
                "Federated": "cognito-identity.amazonaws.com"
            },
            "Action": [
                "sts:AssumeRoleWithWebIdentity",
                "sts:TagSession"
            ],
            "Condition": {
                "StringEquals": {
                    "cognito-identity.amazonaws.com:aud": "us-east-1:8c24ae43-9031-4f0a-b337-464e83d1f7aa"
                },
                "ForAnyValue:StringLike": {
                    "cognito-identity.amazonaws.com:amr": "authenticated"
                }
            }
        }
    ]
}
3. Accessing AWS Services in the Web App.
With the identity pool and IAM policies configured, we can now use the temporary IAM credentials provided by Cognito to access AWS services in our web application. The following is an example of how to use the AWS Javscript SDK to interact with an S3 bucket in a React application. We will use the official @aws-sdk/client-s3 library to interact with the S3 bucket. Assuming we have the id token from the sign in process, the identity pool id, and the identity provider name, we can initialize an AWS SDK client with the temporary credentials provided by Cognito.
  const s3Client = new S3Client({
    region: 'us-east-1',
    credentials: fromCognitoIdentityPool({
      clientConfig: { region: 'us-east-1' },
      identityPoolId: 'us-east-1:8c24ae43-9031-4f0a-b337-464e83d1f7aa',
      logins: {
        'login.microsoftonline.com/e7273277-fd2c-418f-a10f-49673f54d6fb/v2.0': idToken,
      },
    }),
  });
More examples and documentation for setting up credentials from Cognito in the AWS SDK can be found here: https://docs.aws.amazon.com/sdk-for-javascript/v3/developer-guide/loading-browser-credentials-cognito.html.
In our sample app, we decode the preferred_username value from the ID token to extract the user’s email, which is then used to make the appropriate calls to AWS services. If the app attempts to access S3 objects outside the user’s personal folder, an “Access Denied” error will be returned. This behavior is enforced by the IAM policy we configured earlier, which ensures that users can only interact with objects within their designated folder.
A full example of the React app can be found in the GitHub repository.